Digital Developing

Several people have asked me to do a guide of my workflow, what does the editing process look like for me, and while I don’t do anything special (I really don’t), I figured it might be an interesting exercise to step back and reconsider some of the things I’m doing, or others that I don’t. If nothing else, it will be good to have this for posterity.

This article will focus on Lightroom because that’s what I’ve been using to catalog my photos and do post-processing. There is no right or wrong way to edit a photo, this is a very personal process, and is not an exact science — I will also let know that I do not follow this pattern every single time. So, as with everything, take it with a pinch of salt and hopefully I’ll share something useful.

Heads-up: I always shoot RAW (I know, I know) so some parts of this article might not apply to your particular workflow.

Lightroom is divided into 7 different modules: Library, Develop, Map, Book, Slideshow, Print, Web. I only use the first two — Library and Develop — and can’t even remember the last time I visited one of the others. But before, let’s start with importing some photos.

Importing — Adding Photos

This screen might appear simple and unassuming, but here’s where the power of Lightroom’s organization starts.

importing

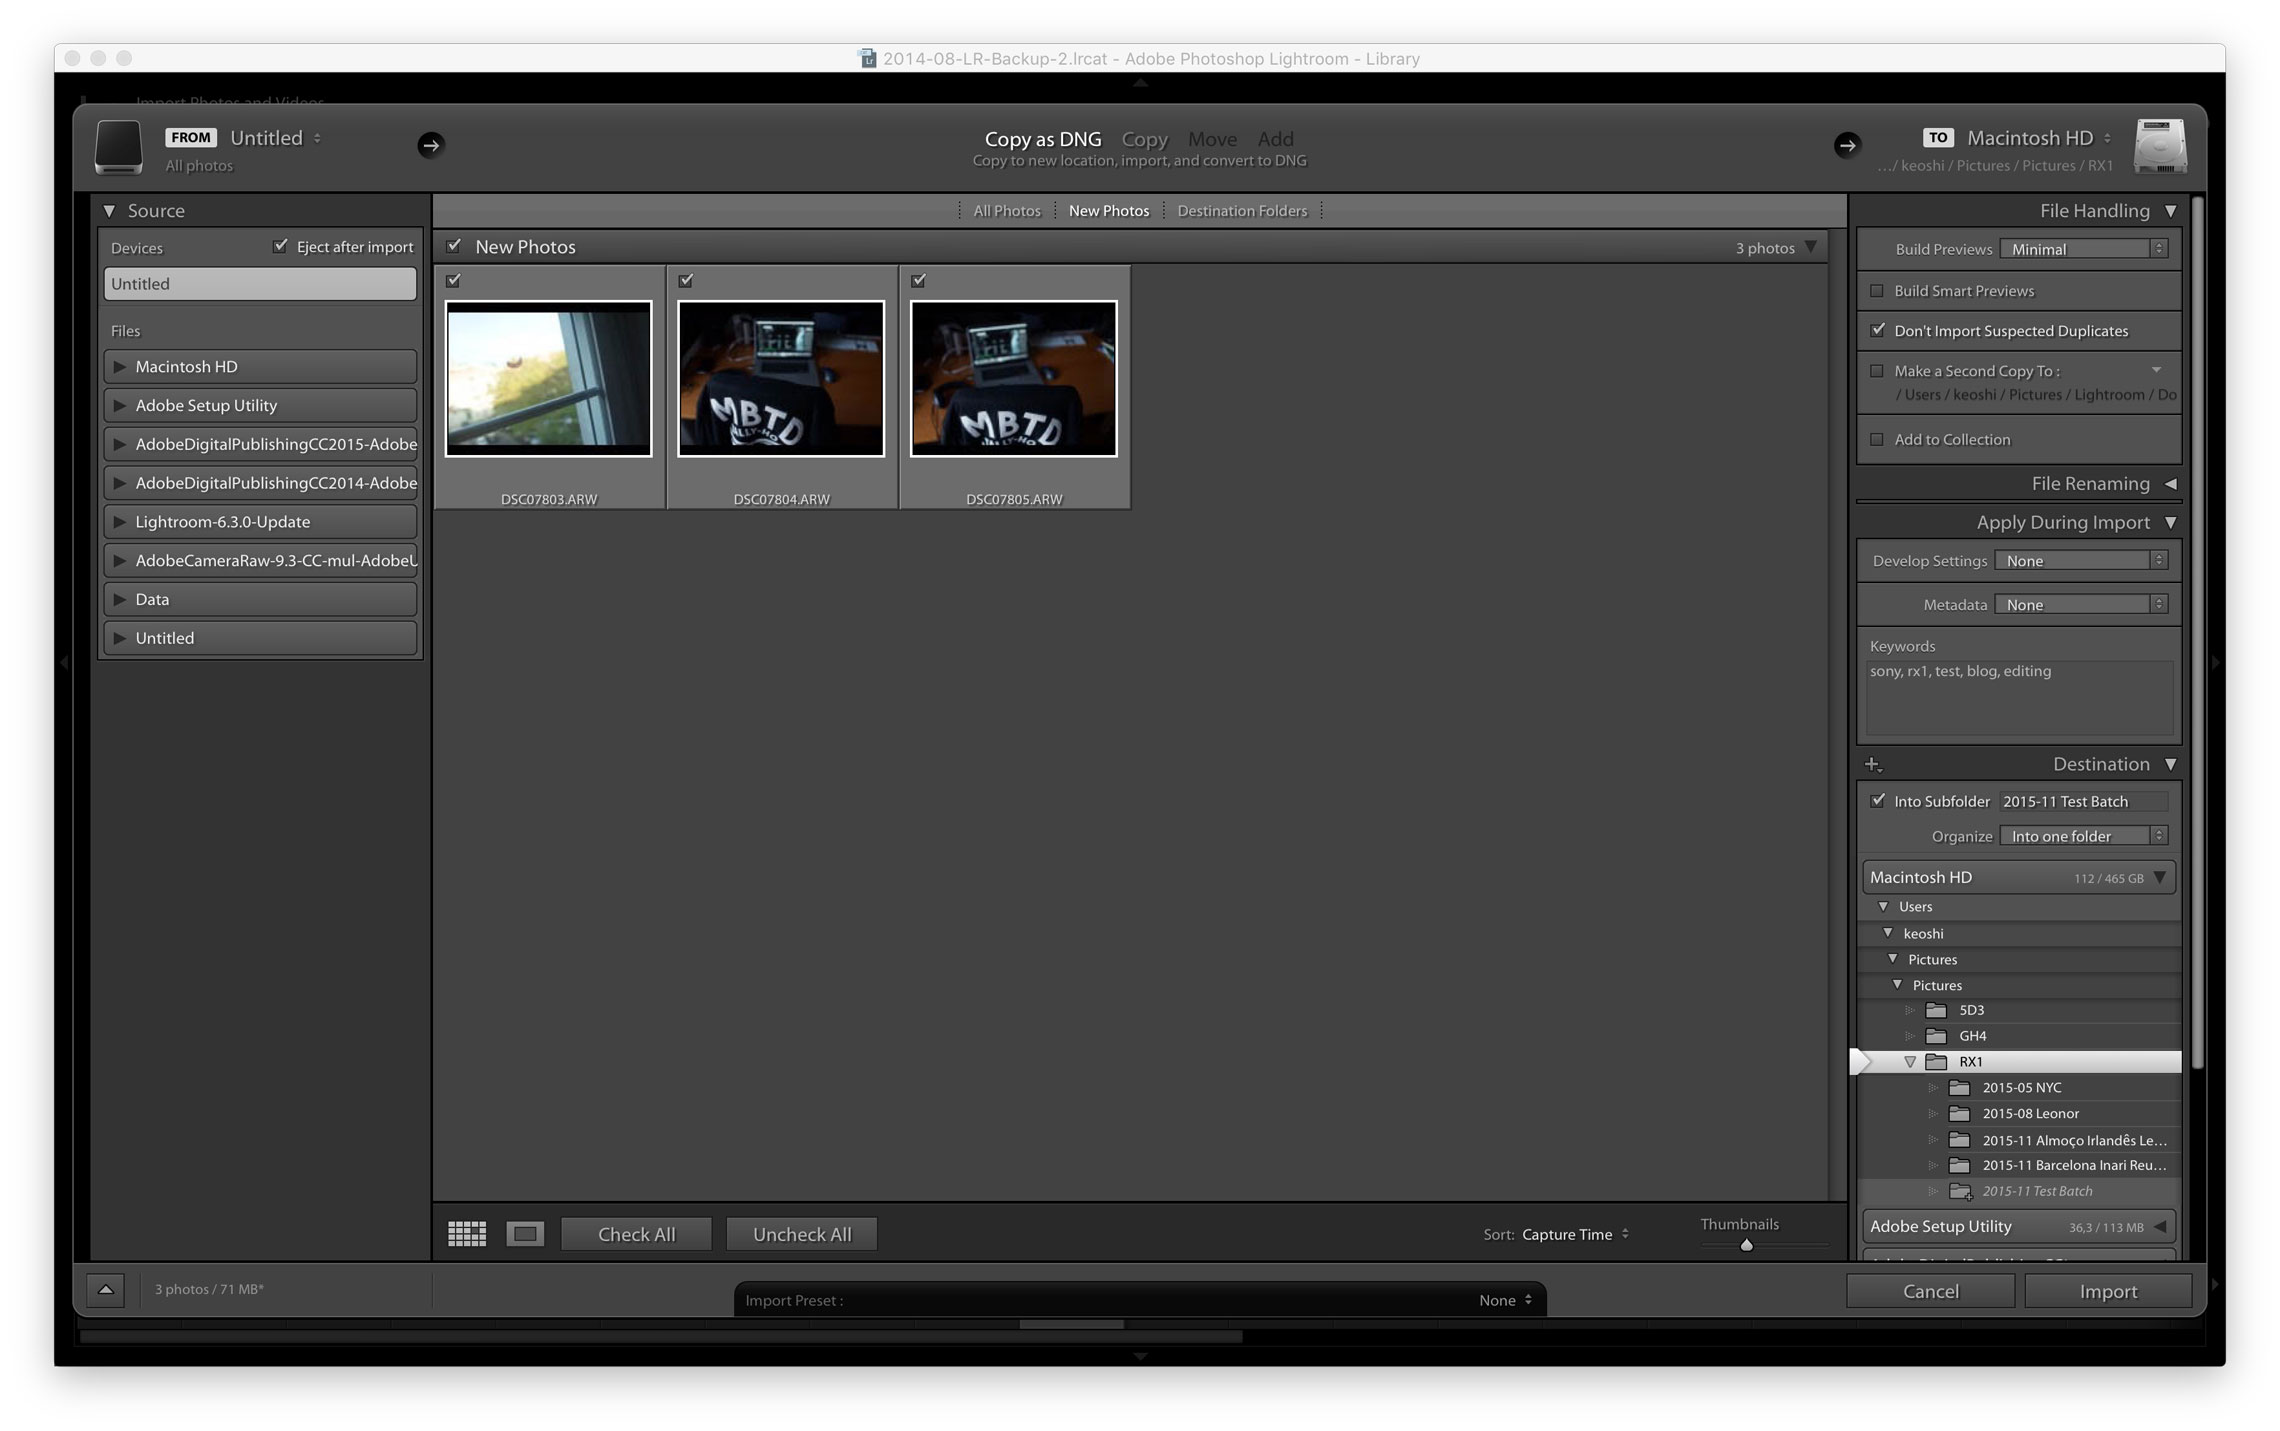
I always make sure to tick these three actions when I import new photos:

  • Copy as DNG: DNG is a open RAW format. I use it because it’s open, it’s widely accepted by other software if I ever want or need to switch, and it usually saves me a few MBs when compared to proprietary RAW image formats.
  • Assign keywords: minimum bearable here; I generally add a couple camera keywords (even though EXIF metadata is always present), place (location, city, country), and the name of people that are in the photos (or animals, because they’re cuddly). I might throw in a specific keyword for that batch that I want to remember later too.
  • Add each batch to a subfolder: I import all my photos to /HD/Users/keoshi/Pictures/[Camera used]/[YYYY-MM Name of the shoot] so I end up with something like this: /HD/Users/keoshi/Pictures/RX1/2015-11 Barcelona.

Library — Small Adjustments & Rating

Once the pictures are in, I go through each of them and rate them between 0 and 2 stars. I use the keyboard keys 0, 1, and 2 to give these ratings. You can also use the shift key in addition to these to skip to the next photo after rating, or just define that in your preferences.

library-rating
  • 0 Stars: otherwise known as left “unstarred”, I skip the pictures that are completely useless (blurred, out of focus, badly lit, extremely under or overexposed).
  • 1 Star: this rating is saved for pictures I’m really unsure about that I might go back to (but really never do). It’s worth noting that very, very few pictures in my entire library have 1 star — most that would fit in this bucket end up not having any stars because it’s just easier not to press any button.
  • 2 Stars: rating given to the photos that will continue on through the editing journey; usually photos with some potential, although a few bad ones might slip by.

In addition to the rating, and to test if some pictures are usable and/or recoverable, I will sometimes use the Quick Develop panel to pull up the exposure, quickly adjust the white balance, or tweak the contrast and others.

Develop — Editing

After switching to the Develop module, and if I haven’t done the adjustments mentioned above (and even if I did), I go through the basic parameters of the image to make it the best baseline it can be: white balance, tint, exposure, highlights, shadows, and contrast.

All these changes are non-destructive to your image, because you’re actually working on meta information that’s inside your LR database, the original file is never modified — experiment and make use of the History panel to go back in time.

digital-developing-original
Original image with no adjustments other than the automatic processing that LR does.
developing-02
digital-developing-basic
Image with basic corrections and adjustments.

I finish applying the first pass of basic corrections and adjustments, but it doesn’t mean I won’t go back later to adjust once I’ve dialed the colors in.

To give pictures a particular look I use VSCO Film — no secrets here. VSCO started releasing presets a while back and they now have 8 different packs (01 through 07 and a free pack titled 00), and they’re all based on a single premise: bring analogue film emulation to the digital world. They have a wide range, that goes from the most subtle films, to the most eclectic, but all done in very good taste.

I use VSCO because it makes pictures look very good with very little effort, and because it makes editing a breeze. And it’s not just film emulation presets, VSCO includes two toolkit packs, that enable very quick adjustments in a very modular way; i.e.: it lets you dial in a bump in blacks, less contrast, more fade, bigger grain, and much more, with one click. So in theory you can edit your photos by simply applying and mixing a multitude of this presets.

Back to color —I can’t remember all the original VSCO presets I used to create my own (17 at the moment), but Portra 400 VC was one of my favorites. I then apply one of the presets I created, derived from VSCO’s own. This is where the magic happens.

Color preset applied, you can clearly see a magenta cast on the whites.
Color preset applied, but there’s a green cast I don’t like.

To correct this green cast, I open up the Split Toning panel, and dial in some adjustments:

  • Highlights: add a tiny bit of blue [252, 1]
  • Shadows: add some magenta to fix the hue in the blacks [286, 7]
  • Balance: realized I might have added more magenta that I needed, so I adjust the balance [+31]
developing-03

After I’m happy with the colors, I go back to the Basic panel and make final adjustments on the exposure, shadows, saturation, add a bit of clarity for more punch, and finally some grain for character.

Original image vs final image

Once I’m happy with the editing, I might just copy and paste one adjustment to all the other photos in the same set, while others might need a few additional tweaks. Finally, I rate every edited picture with 3 Stars.

Exporting — Selecting & Rendering

For the final selection and export, I then go back to rating and follow these rules:

  • 4 Stars: pictures I’m happy to publish; the ones I’m not sit on my library with 3 stars for another occasion.
  • 5 Stars: pictures I really love; these are as rare as the ones with 1 Star mentioned above.

In any case, I then have a few export presets so I can render out the images ready for this blog and its specific galleries and various image sizes.

This article is running long so I’ll end here with only two notes. One: you might have a wrong idea about how much time I spend inside Lightroom, but the truth is that I can go from importing pictures to uploading a set here in less than 5 minutes. Two: explore and find your way.

Hope you enjoyed!

22 responses

  1. Tiago Silva Avatar
    Tiago Silva

    Excelente post! Obrigado :)

      1. Tiago Silva Avatar
        Tiago Silva

        Tenho agora “brincado” com o LR, a ver se meto fotos de Potsdam no Flikr com algum post-processing. Estava aqui a ler e basicamente tu fazes aqueles passos todos de: quick develop->Ajustes básicos em Develop->aplicar preset->novamente fazer ajustes se necessário.

        A coisa que fiquei a pensar foi, não seria melhor aplicar logo o VSCO preset e depois fazer os ajustes necessário consoante o preset que nós gostamos? Com aqueles ajustes iniciais antes de aplicar o preset se calhar podemos estar a meter ajustes que não combinam bem com o preset. Mas isto sou eu o noob a falar. :D

      2. Tiago Silva Avatar
        Tiago Silva

        Mas realmente encontrei isto no manual do VSCO “Note that any settings you do with highlights, shadows, whites and blacks will be over-ridden by VSCO Film, only White Balance and Exposure will not change.”. Por isso não sei mesmo, eu realmente estava já a fazer melhorias nos highlights, shadows, whites and blacks. Significa que quando aplicar o preset este trabalho que fiz anteriormente não serviu de nada. Mas provavelmente percebes melhor do que eu :)

      3. Antes de mais queria agradecer o teu mail extra detalhado que li com muita atenção e acho que vamos mesmo lá, mesmo não sendo a melhor altura para ver. Obrigado! :D

        Depois, um preset é um conjunto de alterações. Os do VSCO realmente alteram (quase?) sempre os básicos, portanto se fores aplicar um preset standard do VSCO não aconselho a mexeres nesses antes porque vão mesmo ser alterados.

        Se reparares no LR quando fazes copy/paste ou guardas um preset, ele dá-te a escolher quais os parâmetros a guardar: https://cloudup.com/crHwNM3bvdg

        O que fiz quando guardei os meus foi escolher o que guardar, e em quase todos tirei o “Basic Tone” porque gosto sempre de alterar primeiro ao meu gosto; caso contrário aplico um dos outros presets que já incluem as modificações do basic tone. :)

        Quanto aos perfis das câmaras, convém sempre utilizar os presets específicos para cada maker porque têm modificações pequenas mas muito particulares para obter sempre a mesma imagem final, seja qual for o sensor usado (Sony, Nikon, Canon, etc.).

      4. Tiago Silva Avatar
        Tiago Silva

        De nada :) mas desculpa se não está muito bem estruturado, eu não tenho muito jeito para escrever por acaso eheh

        Ah ok, obrigado pela dica :) mas então dos que chegaste a me passar, os teus presets modificados, são os que se encontram na pasta presets ou rni films 3.0?

        Já agora, Feliz Natal, Bom Ano Novo e divirtam-se por Berlim ;)

      5. Hey! Foi muito fixe: algum frio, muito fogo de artifício, e correu tudo bem. :)

        Os meus presets não estão incluídos, o que te passei é só o default.

      6. Tiago Silva Avatar
        Tiago Silva

        Ainda bem :) Uma pergunta, eu fiz as minhas primeiras edições no Lightroom, já descobri o publish services e escolho para hard drive, mas tem muitas opções. Tu mudas alguma coisa nas opções ou é mesmo simplesmente fazer “Save”? Eu pelo menos diria meter a Quality a 100 e ficheiro Jpeg, não?

        Ou afinal é escolher a opção Export? Pelo menos é muito parecido.

      7. Eu uso sempre o export com estas settings que também criei para o blog: https://cloudup.com/ccZSqece1CV

        Algumas cenas específicas:
        – Tenho um custom name que vai buscar o título da foto ao campo “Caption”
        – Cada batch exportado vai para um folder na Dropbox, que depois renomeio.
        – Qualidade a 58 porque são retina, caso contrário escolheria qualquer coisa entre 65 e 72.
        – Resizing específico para os tamanhos aqui.
        – Inclui toda a metadata mas depois tiro enquanto faço a compressão automática no ImageOptim.

        E é isso :)

      8. Tiago Silva Avatar
        Tiago Silva

        Hum, ok, nice. Já exportei, mas tinha metido qualidade 100 e não mexi no resizing :)

        Mas então não percebi a da quality, não devia ser 100 para manter a qualidade original? Se não mexer no resizing suponho que mantém o tamanho original também.

        Uma coisa que também reparei agora no final de editar as fotos é que basicamente ficamos com três pastas, com três tipos de ficheiro, ARW, DNG e JPEG. Ainda ocupa bastante espaço isto, de qualquer forma, suponho que manter os três sejam importantes, não? O ARW é o negativo digital original (ou apagas estes depois de teres os DNGs?), o DNG são os nossos ficheiros da Adobe que contém as edições (se apagar estes ficheiros vou perder o meu catálogo no Lightroom?) e o JPEG é o produto final para publicarmos seja em que website for.

  2. Don’t remember last time I shot RAW. Great post, thanks.

    1. Yesterday I made the RX1R2 deal official — can’t wait to shoot JPG and edit right off the iPhone! :)

      1. Yay!!

        For some reason I couldn’t transfer the photos to the iPhone in São Tomé. I was properly pissed. Had to edit them all after getting back, but still did it on the iPhone.

      2. Did you figure it out? It is a direct wifi connection from the camera straight to the phone, right?

      3. I didn’t. As soon as we got back home, it started working again. Strangely it happened to both Leica and Fuji. Odd as hell.

      4. Bruno Monteiro Avatar
        Bruno Monteiro

        Whoa! The new RX1 seems sweet, but let me take that out of the way and ask you how you edit the JPGs on the iPhone? Eyefi? :)

      5. Built-in wifi connection, *finally*! :D

      6. Bruno Monteiro Avatar
        Bruno Monteiro

        Ahhh! So there’s no hope for me :'( snif… Still using my thrusty X100s :)

      7. There’s always hope. Lena is using a Eyefi card to edit ALL of her photos: instagram and blog, and it works perfectly. It’s not cheap, but it’s an option.

  3. Beautiful post, gets me in the mood for image processing. I normally hate doing that, which makes it an even bigger compliment I guess ;-). I see editing / rating the images as an important part. For me as a processing-slacker it’s the most time I spend with a picture. Separating this to a software that can’t process the images helped me a lot, making me spend even less time processing since I simply can’t do it when working on rating my frames. Sad thing is that these editing products are not really common any more and you need to use outdated (Expression Media 2) or poorly maintained (Capture One Media Pro) software. Still sticking to this, maybe just an old dog & new tricks thing.

  4. Hey thats a pretty crisp post on lightroom post processing. 👍🏻

    1. Thanks, Rishi! Glad you found it interesting. :)

Leave a Reply to Tiago SilvaCancel reply

Continue exploring

Don't miss a post

Join 635 other subscribers